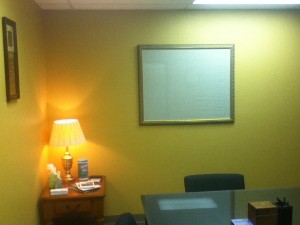
Here at iMoneyCoach we practice what we preach. And that includes saving money on projects around the office, like our recent redecoration. The office hadn’t been decorated in nearly 8 years and needed some inexpensive but stylish updating.
One of our fun yet inexpensive projects included making a new whiteboard for one of our conference rooms. We had just used some rich, warm colors to update the office, so to put the stark bright whiteboard up on the wall felt a little sad. So we came across a great idea – it’s not an original idea, so we won’t take credit for that, but we loved it and had to share – to use a decorative frame as a whiteboard instead. That way clients don’t suffer a break in the warm decor, and we don’t have an eyesore against the wall. PLUS, it is cheap to make if you do it right and works great!
So how do you get started? The way I did it was to scour craigslist.org for a couple of days to find just the right picture frame at just the right price. I did check out the local thrift store, but we wanted a frame that was still about 3 feet by 4 feet, and the thrift store pictures were expensive!! We’re talking $70 for the cheapest one, and it really wasn’t a great frame.
Anyways, after a couple of days I came across someone getting rid of an ornate 3 ft. by 4ft. picture for $25. I emailed and ended up on the phone later with the seller who said the glass was in perfect shape and that she’d be home that afternoon for me to pick it up (hint: be sure you make sure to ask about the glass since that’s what you’ll be writing on. I realized a lot of posts had the pictures but were missing the glass because it was broken or there just wasn’t any).
After picking up the picture and cleaning up both frame and glass with my trusty Windex, I headed for the fabric store. I picked out a very light print that matched the room this board would be going in. A big part of the project was getting rid of that bright white in the room, but we still needed something that would not overpower the writing in front of it. I chose a creamy fabric that had light beige flowers and vines on it.
To put it all together: First measure and cut your fabric. You want anywhere from 3-6 inches hanging over the back so you can secure it tightly. Ideally you will be able to staple the fabric to the back of the matteboard in the frame. In my case, there was a foam board that the picture was attached to, and the staples went right through it! So we improvised and used heavy duty tape to pull the fabric taught and then folded down the hooks all around the edges of the frame to hold it in place.
And voila! You have an inexpensive but artistic board to write on! And it erases just as easily. It doesn’t have to cost a lot to update the look of your office or home. But making some small changes without spending too much can make a BIG difference!


![Validate my RSS feed [Valid RSS]](images/valid-rss-rogers.png)