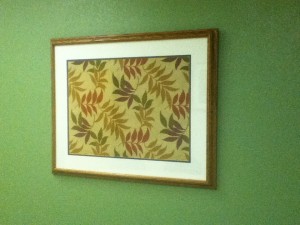
We recently completed a big office update here at iMoneyCoach. To cut costs, we repurposed several items into new decorations that look fabulous. This re-purposing included some artwork that was a little bit, well, outdated. But the frames were very nice and just needed a little change. I enjoy DIY projects that save money and allow for a personalized product.
 So I took a little trip over to the fabric store (while they were having a sale and with my coupons in hand) and found some incredible fabric that matched the pretty green we just painted one of our conference rooms. Now, this particular fabric wasn’t on sale, but I was able to use my 50% off coupon that had a condition of not being able to use it on a sale item.
Here are the steps to take to turn your old picture into a new work of art:
1. Find an old picture with a nice frame that you want to repurpose. This could be one already in your home or office, or you can check out the local thrift store, garage sales, or craigslist. Measure your frame and write down the dimensions. You’ll want to make sure the fabric you get is big enough to allow you to wrap it behind the picture with about 2 inches to spare on all sides.
2. Head to the local fabric store. Keep in mind what colors you’d like and what patterns match your style. If you don’t like flowers, don’t get a floral pattern. But do try to be open to a new style if you are working on updating your space so you don’t get stuck with the same look you had before.
3. Take apart your picture. This may mean pulling out staples or lifting up metal tabs to get the back off. Be very careful lifting out the glass. Now would be a good time to clean it before you put the whole thing back together.
4. Use the board that was already in the frame and wrap your fabric around it. Depending on the material of your board and its thickness, you may be able to staple your fabric all around the back. This is the easiest way to do it. Unfortunately, this doesn’t always work because the boards in pictures tend to be different sizes, and you may find that a staple will go right through to the front. If that is the case, you can try using heavy duty tape or glue to secure your fabric. Be sure that you start with one side, then do an adjacent side. Then you can pull your fabric tight so it looks nice, but not so tight that it causes tearing, rippling, or makes the pattern look odd.
 5. If you have matteboard, put that back in with the glass, then put the fabric covered board back in. Secure the back to the frame. And voila! A beautiful work of art that doesn’t cost an arm and a leg. It is also a good conversation starter – especially if you are in the business of helping people make budgets and be able to stick to them.
If you make a do-it-yourself fabric picture like this, please let us know about your experience and your savings! We would love to see a picture of the finished product. And if you are ever close by, be sure to stop in the iMoneyCoach office and check out our recent updates. We’re always happy to see you.
Tags: decorate, DIY, frame, save money

![Validate my RSS feed [Valid RSS]](images/valid-rss-rogers.png)